一、简介
实现raid的方式分为硬raid和软raid,主要的区分判断其是否有独立的硬件来实现raid。mdadm工具属于软raid,虽然使用起来成本较低,但是其所有的功能是依托于操作系统层面,效率会低一些。
二、创建raid
#以创建raid5为例
1、安装mdadm工具
# yum install -y mdadm
2、列出/查看系统中的块设备
# lsblk
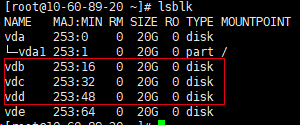
此处有四块盘,使用vdb、vdc、vdd来创建raid5,vde用于热备和模拟磁盘损毁后的修复
3、创建raid5
3.1 无热备:创建名称为md0,raid成员数量为3的raid5,使用的磁盘为vdb、vdc、vdv
# mdadm -C /dev/md0 -l 5 -n 3 /dev/vd{b,c,d}
# mdadm -D /dev/md0    //查看磁盘阵列的详细信息
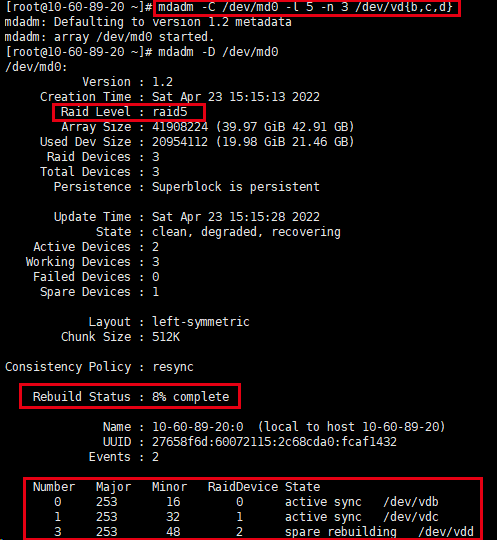
创建后可看见磁盘正在同步
3.2 有热备:创建名称为md0,raid成员数量为3,热备盘数量为1的raid5,使用的磁盘为vdb、vdc、vdv、vde
# mdadm -C /dev/md0 -l 5 -n 3 -x 1 /dev/vd{b,c,d,e}
# mdadm -D /dev/md0    //查看磁盘阵列的详细信息
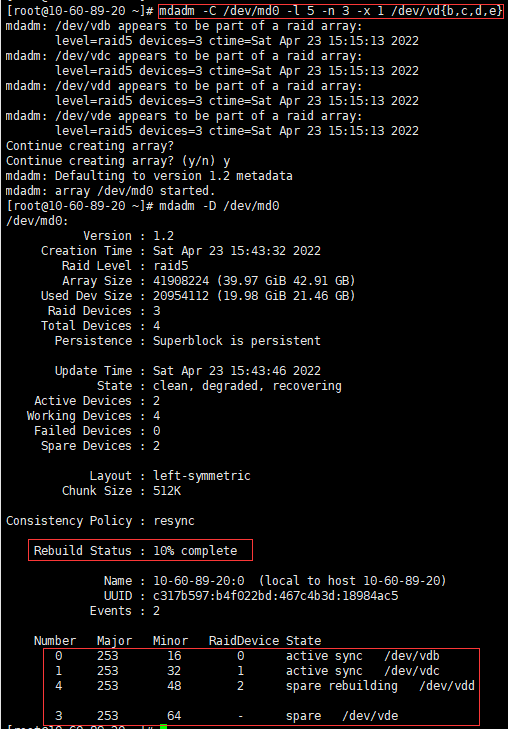
创建后可看见磁盘正在同步,vde为热备盘
4、文件系统格式化,并挂载
# mkfs.ext4 /dev/md0
# mkdir /data
# mount /dev/md0 /data

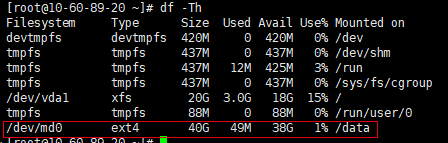
查看磁盘情况
# df -Th
三、模拟损坏磁盘阵列及修复
模拟损坏/dev/md0磁盘阵列中的/dev/sdc
# mdadm /dev/md0 -f /dev/vdc

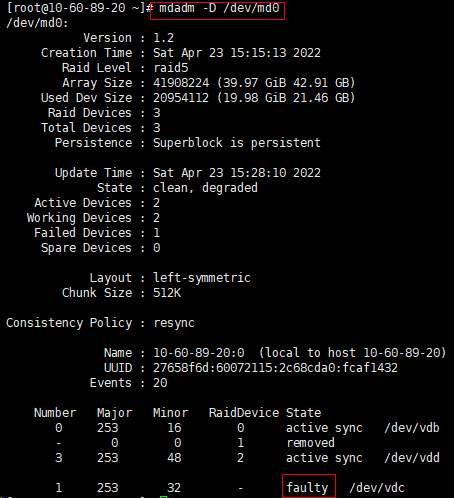
查看磁盘磁盘阵列信息,发现/dev/vdc为faulty状态
# mdadm -D /dev/md0
加入一块修复盘vde
# mdadm /dev/md0 -a /dev/vde

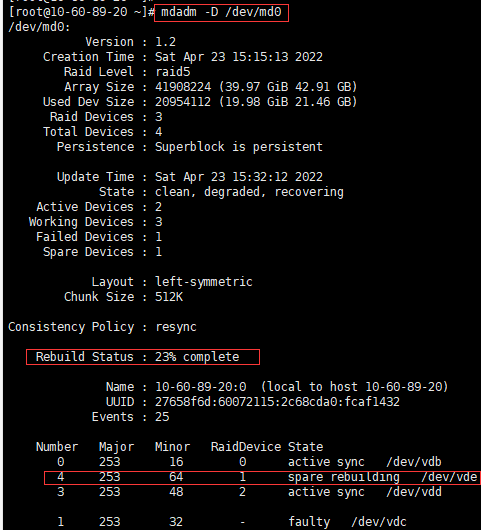
查看磁盘磁盘阵列信息,磁盘阵列正在重建,可以看见重建的进度
# mdadm -D /dev/md0
重建完成后移除故障盘即可
# mdadm /dev/md0 -r /dev/vdc


四、移除磁盘阵列
移除磁盘阵列需要先解除挂载
# umount /dev/md0 /data
停止raid磁盘阵列
mdadm -S /dev/md0

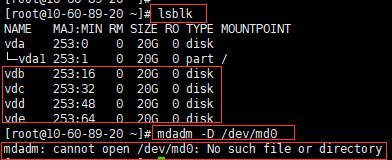
再查看块设备信息和磁盘阵列信息,已无磁盘阵列
# lsblk
# mdadm -D /dev/md0
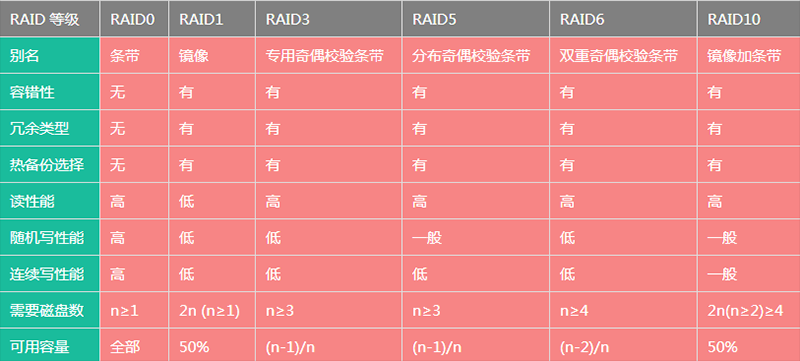
五、主流磁盘阵列对比
六、mdadm常用参数
|
参数
|
作用
|
|
-a
|
检测设备名称
添加磁盘
|
|
-n
|
指定设备数量
|
|
-l
|
指定RAID级别
|
|
-C
|
创建RAID
|
|
-v
|
显示过程
|
|
-f
|
模拟磁盘损坏
|
|
-r
|
移除磁盘
|
|
-Q
|
查看摘要信息
|
|
-D
|
查看RAID信息
|
|
-S
|
停止RAID
|
|
-x
|
指定热备盘个数,热备盘能在工作盘损坏后自动顶替
|
© 版权声明
文章版权归作者所有,未经允许请勿转载。